加装
辅助驾驶摄像头
配件:
1. 辅助驾驶摄像头
2. 护罩
3. 无边框后视镜(不带 FLA)
4. 后视镜固定护罩
5. 线束
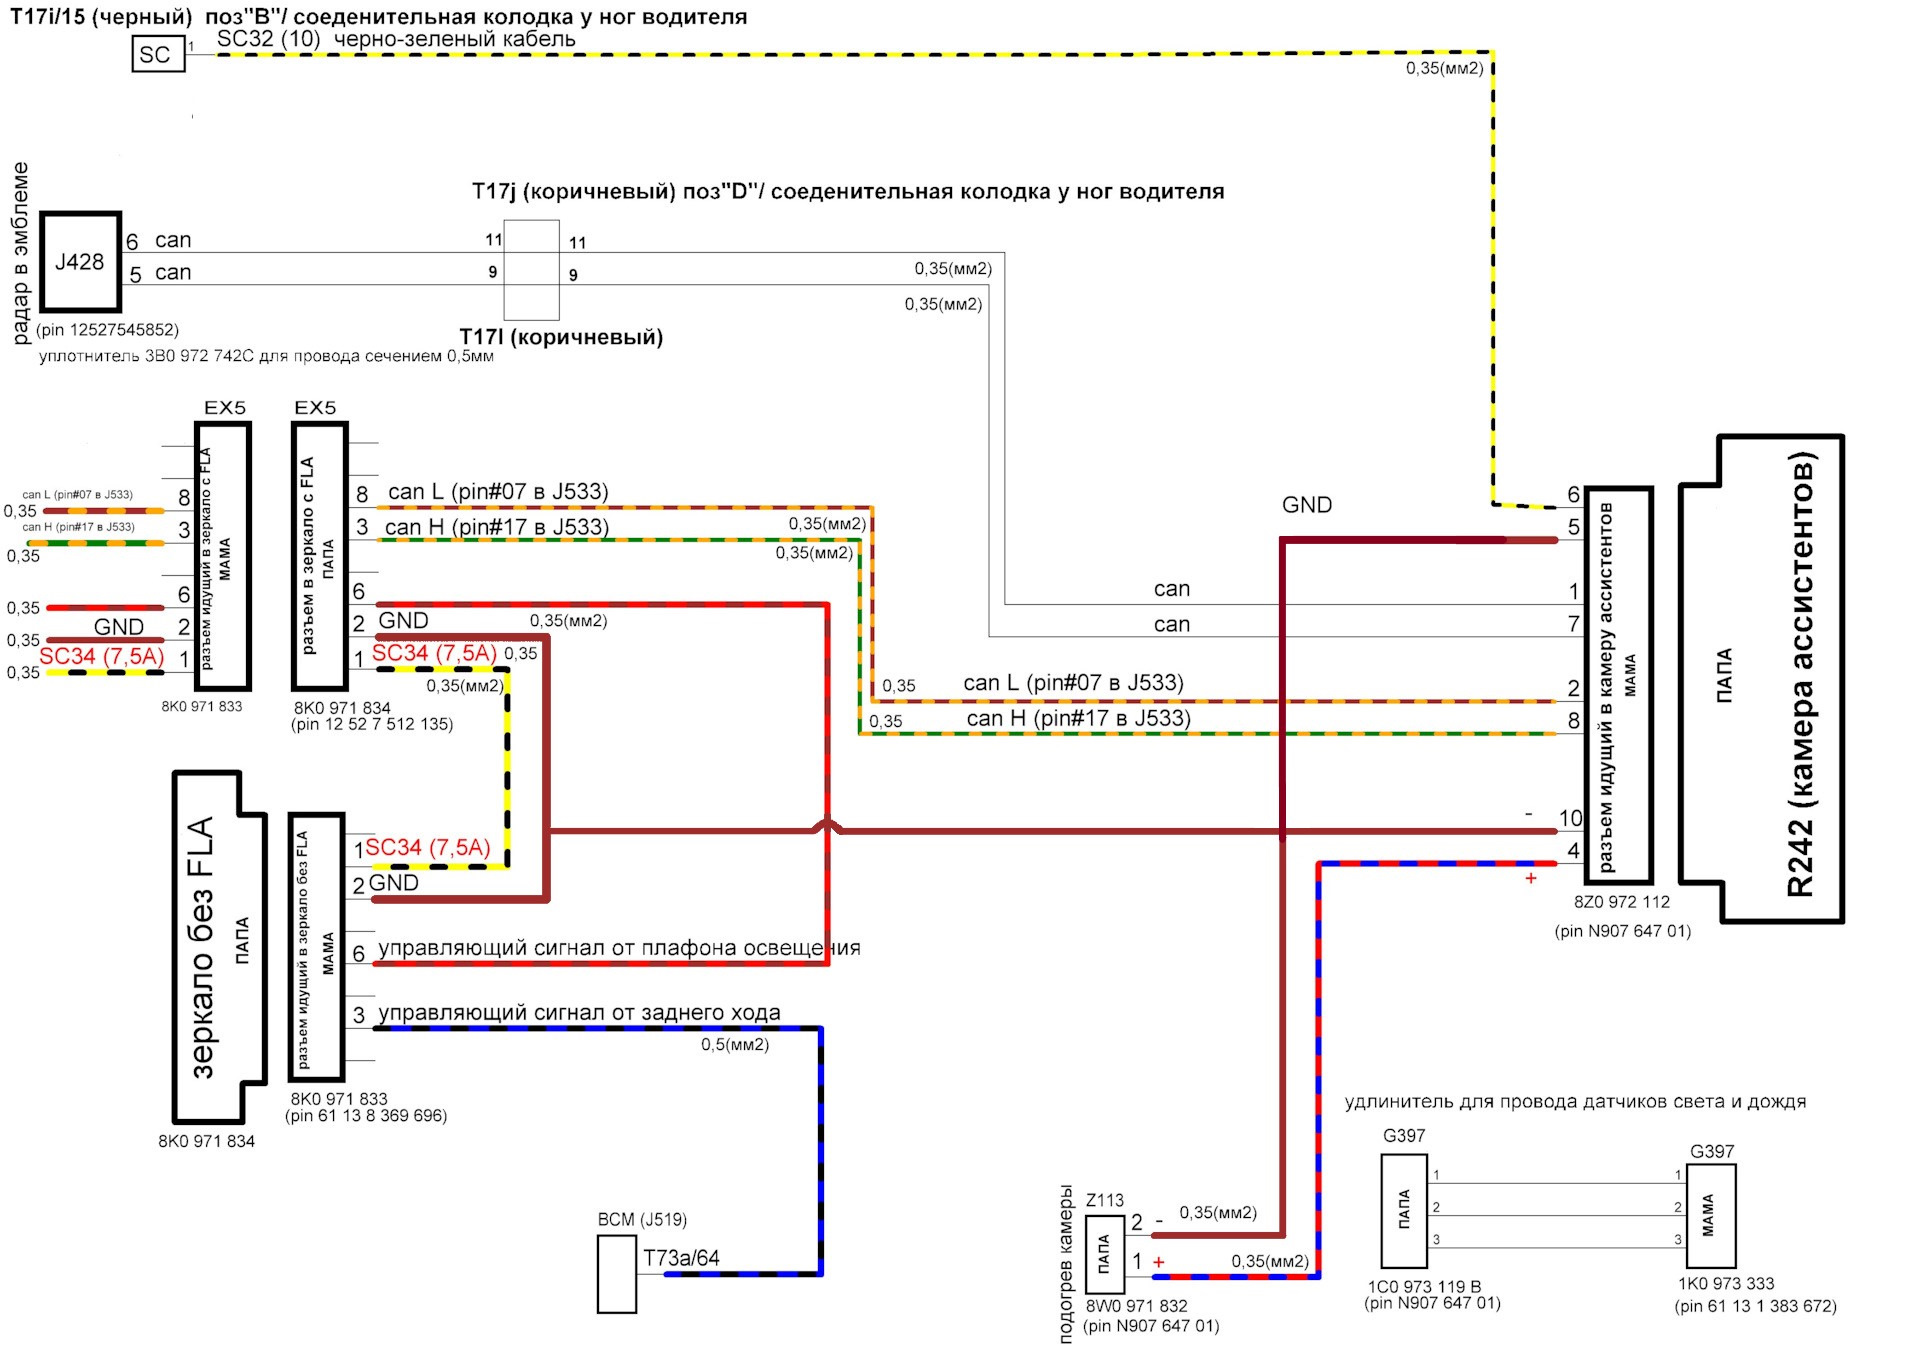
接线示意图:
摄像头 A5 (R242) 的 1 号针脚 -→ ACC 雷达 (J428) 的 6 号针脚
摄像头 A5 (R242) 的 7 号针脚 -→ ACC 雷达 (J428) 的 5 号针脚
6 号针脚 — "+"
5 号针脚 — "-"
2 号针脚 — Can extended low – 后视镜插接器中的 8 号针脚
8 号针脚 — Can extended high – 后视镜插接器中的 3 号针脚
4 号针脚 — 摄像头加热器正极线
10 号针脚 — 摄像头加热器负极线
示意图
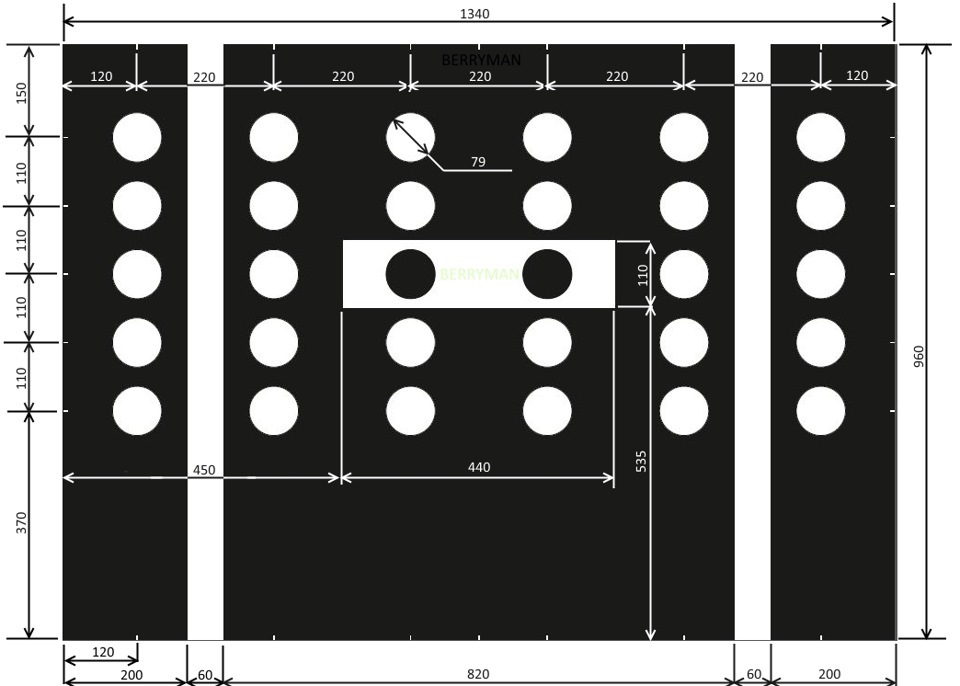
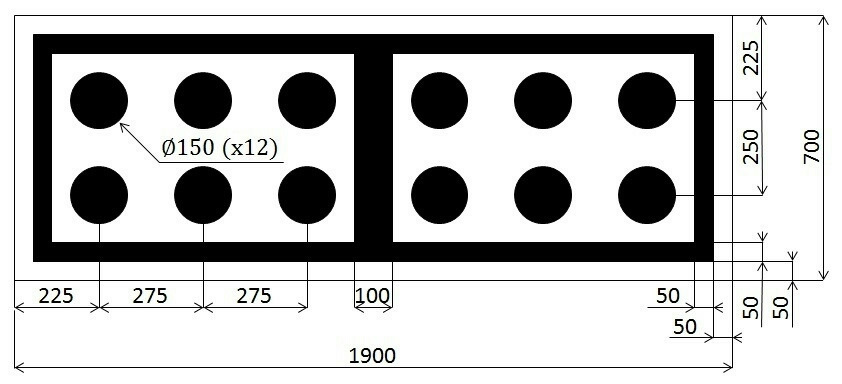
校准用标定板
空调触控面板
模块 08 → 编码:
Climate_style → display 改为 Anzeige Front und Heck
→ 应用(重启模块)
模块 08 → 匹配:
Detection_time_tap:
- par_Detection_time_tap: 600 ms
Detection_time_hold:
- par_Detection_time_hold: 600 ms
Off_time_neighbor_key_during_sliding:
- par_Off_time_neighbor_key_during_sliding: 400 ms
Sensitivity_touch:
- par_Sensitivity_touch: 0
Steps_temp_slider:
- par_Steps_temp_slider: 8
Step_size_temp_slider:
- par_Step_size_temp_slider: 0.5°C
22_degree_jump_temp_slider:
- par_22_degree_jump_temp_slider: not_active
Flick_function_temp_slider:
- par_Flick_function_temp_slider: not_active
Profile_selection_touch:
- par_Profile_selection_touch: 0
dimming_characteristic_new_1:
- X1: 0
- Y1: 16
- X2: 10
- Y2: 16
- X3: 50
- Y3: 60
- X4: 100
- Y4: 125
- X5: 150
- Y5: 500
- X6: 253
- Y6: 1,000
dimming_characteristic_new_2:
- X1: 0
- Y1: 0
- X2: 10
- Y2: 100
- X3: 25
- Y3: 250
- X4: 50
- Y4: 500
- X5: 75
- Y5: 750
- X6: 100
- Y6: 1,000
dimming_characteristic_new_3:
- X1: 0
- Y1: 6
- X2: 10
- Y2: 6
- X3: 50
- Y3: 12
- X4: 100
- Y4: 25
- X5: 150
- Y5: 100
- X6: 253
- Y6: 300
dimming_characteristic_new_4:
- X1: 0
- Y1: 20
- X2: 10
- Y2: 20
- X3: 50
- Y3: 60
- X4: 100
- Y4: 120
- X5: 150
- Y5: 800
- X6: 253
- Y6: 1,000
dimming_characteristic_new_5:
- X1: 0
- Y1: 10
- X2: 10
- Y2: 10
- X3: 50
- Y3: 50
- X4: 100
- Y4: 100
- X5: 150
- Y5: 1,000
- X6: 253
- Y6: 1,000
dimming_characteristic_new_6:
- X1: 0
- Y1: 4
- X2: 10
- Y2: 4
- X3: 50
- Y3: 15
- X4: 100
- Y4: 30
- X5: 150
- Y5: 600
- X6: 253
- Y6: 1,000
dimming_characteristic_new_7:
- X1: 0
- Y1: 20
- X2: 10
- Y2: 20
- X3: 50
- Y3: 50
- X4: 100
- Y4: 100
- X5: 150
- Y5: 800
- X6: 253
- Y6: 1,000
dimming_characteristic_new_8:
- X1: 0
- Y1: 8
- X2: 10
- Y2: 8
- X3: 50
- Y3: 20
- X4: 100
- Y4: 25
- X5: 150
- Y5: 600
- X6: 253
- Y6: 1,000
dimming_characteristic_new_9:
- X1: 0
- Y1: 14
- X2: 10
- Y2: 14
- X3: 50
- Y3: 32
- X4: 100
- Y4: 41
- X5: 150
- Y5: 800
- X6: 253
- Y6: 1,000
dimming_characteristic_new_10:
- X1: 0
- Y1: 10
- X2: 10
- Y2: 10
- X3: 50
- Y3: 25
- X4: 100
- Y4: 50
- X5: 150
- Y5: 800
- X6: 253
- Y6: 1,000
damping_dimming_characteristic_01:
- PWM_Daempfung_Aufdimmen: 0.2 s
- PWM_Daempfung_Abdimmen: 0.1 s
damping_dimming_characteristic_02:
- PWM_Daempfung_Aufdimmen: 0.2 s
- PWM_Daempfung_Abdimmen: 0.1 s
damping_dimming_characteristic_03:
- PWM_Daempfung_Aufdimmen: 0.2 s
- PWM_Daempfung_Abdimmen: 0.1 s
damping_dimming_characteristic_04:
- PWM_Daempfung_Aufdimmen: 0.2 s
- PWM_Daempfung_Abdimmen: 0.1 s
Sun_sensor_supplier_differentiation:
- par_Sun_sensor_supplier_differentiation: none
→ 应用
湿度传感器
传感器 3Q0907643 用于替换原车的脏空气传感器
模块 08 → 编码:
字节 9 – 位 4-5(10 – 已安装车外空气湿度传感器 / Sensor_for_air_humidity_outside):激活
Reduction of window misting outside at high humidity: Matching glass temperature model
→ 应用(重启模块)
模块 08 → 匹配:
Reduction of window misting outside at high humitity:
- param_Reduction_of_window_misting_outside_at_high_humitity: Matching coding
→ 应用
DYNAUDIO
模块 19 → 匹配:
Installation list – specified installations:
- Sound System: Not coded
- Digital Sound System Control Module: Yes
GW_Enable_CAN_Timeout_DTC:
- Sound System: Enabled
→ 应用
模块 5F → 编码:
byte_4_Channel_1_HT: not_installed
byte_4_Channel_1_TT: not_installed
byte_4_Channel_2_HT: not_installed
byte_4_Channel_2_TT: not_installed
byte_4_Channel_3_HT: not_installed
byte_4_Channel_3_TT: not_installed
byte_4_Channel_4_HT: not_installed
byte_4_Channel_4_TT: not_installed
byte_5_Channel_5_HT: not_installed
byte_5_Channel_5_TT: not_installed
byte_5_Channel_6_HT: not_installed
byte_5_Channel_6_TT: not_installed
byte_5_Channel_7_HT: not_installed
byte_5_Channel_7_TT: not_installed
byte_5_Channel_8_HT: not_installed
byte_5_Channel_8_TT: not_installed
byte_6_Channel_9_HT: not_installed
byte_6_Channel_9_TT: not_installed
byte_6_Channel_10_HT: not_installed
byte_6_Channel_10_TT: not_installed
byte_6_Channel_11_HT: not_installed
byte_6_Channel_11_TT: not_installed
byte_6_Channel_12_HT: not_installed
byte_6_Channel_12_TT: not_installed
byte_7_Channel_13_HT: not_installed
byte_7_Channel_13_TT: not_installed
byte_7_Channel_14_HT: not_installed
byte_7_Channel_14_TT: not_installed
byte_7_Channel_15_HT: not_installed
byte_7_Channel_15_TT: not_installed
byte_7_Channel_16_HT: not_installed
byte_7_Channel_16_TT: not_installed
byte_11_Sound_System: Sound_System_external_MOST
→ 应用(重启模块)
模块 5F → 匹配:
Sound System: yes
Startup_screen_sticker_HMI: 2
Car_Function_List_BAP_Gen2:
- Amplifier_0x2D: not activated
- Amplifier_0x2D_msg_bus: Databus Infotainment
→ 应用
[PR-KA1] 倒车摄像头
线束连接
- 正极(30 端子)取自 Quadlock 插接器中的粗红色或粗红黄色线
- 搭铁取自 Quadlock 插接器中的粗棕色线
- 信息娱乐 CAN 总线 — 摄像头信号
- 12 号针脚应连接摄像头视频线的"编织屏蔽层" — 黑色导线
- 6 号针脚 — 同一根线的中心芯线 — 白色导线
- 这些是蓝色插接器最边缘的针脚。
- 橙紫色 — 接到 Quadlock 橙紫色 — 灰色插接器 6 号触点
- 橙棕色 — 接到 Quadlock 橙棕色 — 灰色插接器 12 号触点
检查时务必关闭后备箱!
模块 19 → 设备列表:
6C(摄像头):已安装
→ 应用
模块 5F → 编码:
字节 19 – 位 4(byte_19_Rear_View_Low):关闭
→ 应用
模块 5F → 匹配:
Car_Function_List_BAP_Gen2:
- VPS_0x0B: 激活
- VPS_0x0B_msg_bus: Databus 改为 Infotainment
→ 应用
泊车辅助设置
模块 76 → 编码:
字节 2 – 位 4-5(10 – Camera Type: Rear View Camera (RVC)):激活
→ 应用(重启模块)
如果未进行摄像头校准 — 会持续存在故障码 — 缺少基础参数。
安装国产摄像头
主机也可以连接不支持轨迹线的国产摄像头。但此时需要修改若干编码:
模块 5F → 编码:
字节 19 – 位 4(byte_19_Rear_View_Low):激活
→ 应用
模块 5F → 匹配:
Car_Function_List_BAP_Gen2
- VPS_0x0B: 关闭
→ 应用
校准用标定板
后门 Kessy 门把手
配件:
— 门把手 510837205G 510837206G
— 来自 Tiguan 的前门线束总成
— 与线束对插端的插接器
— 车门插接器针脚,各 6 个:12527545852 和 12527512135
— Kessy 模块针脚 6 个 N90764701
右门接线示意图:
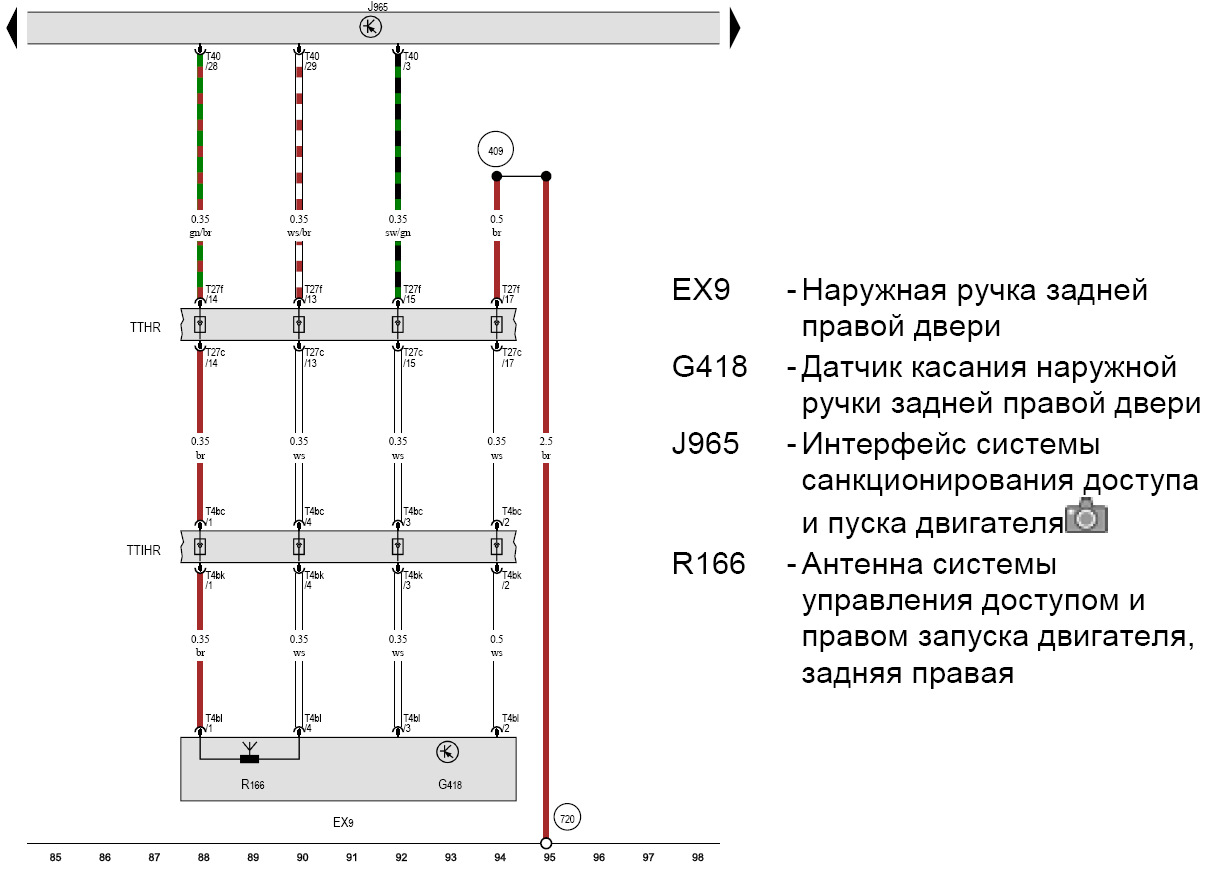
左门接线示意图:
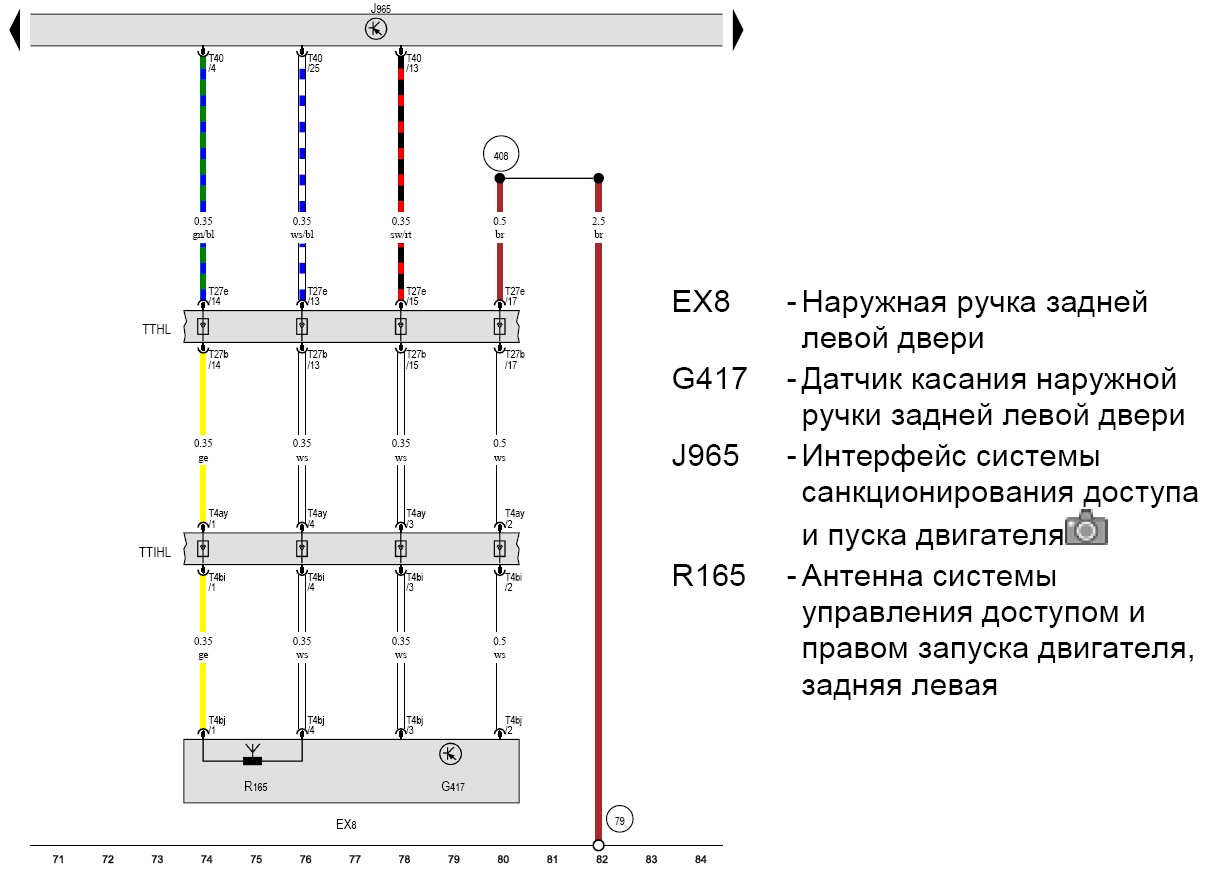
线束布置原则:
1. 每个门把手引出 4 根线 — 3 根到 Kessy 模块,1 根搭铁。
2. 需将门把手的 3 根线穿过门内饰板上的橡胶护套。
3. 然后导线经波纹管到车门插接器。
4. 从插接器出来后导线接到 Kessy 模块。
步骤:
1. 拆开车门(拆下内饰板),按 ELSA 中的说明拆下旧门把手并安装新门把手,将导线从车门的"湿区"向外引出,布线时保证玻璃下降时不会剐到导线。
2. 将每侧 3 根导线从门把手的成品线束引到车门插接器,搭铁线接到车门模块上的搭铁点,与出厂线束缠绕在一起,并将车门与立柱之间的插接器插针,为此需要部分拆下车门线束。
3. 将导线插入后门插接器。
4. 将门把手的线插入立柱插接器。
5. 沿门槛和脚部照明线束,将导线从车门立柱敷设到 Kessy 模块,并按说明插针。
模块 B7 → 编码:
字节 0 – 位 2(左后门左侧 Kessy 门把手,Activation of Kessy door handle, left rear door):激活
字节 0 – 位 3(右后门左侧 Kessy 门把手,Activation of Kessy door handle, right rear door):激活
字节 1 – 位 2(左后门无钥匙进入已关闭,Passive entry left rear door handle):关闭
字节 1 – 位 3(右后门无钥匙进入已关闭,Passive entry right rear door handle):关闭
→ 应用
[PR-7Y1,7Y5] Side Assist – 盲区监测系统
雷达有两种类型。自 2020 年起供货的雷达无需解除组件保护,也无需校准。
参数数据集:
| 设备 ID | 固件 | 参数数据集 (ODIS XML) |
|---|---|---|
| 2Q0907685B / 2Q0907686B (176) | (下载) | (下载) |
| 2Q0907685C / 2Q0907686C | (下载) | (下载) |
模块 19 → 设备列表:
3C(车道变换辅助系统):已安装
CF(车道变换辅助系统):已安装
Gateway_Component_List:
- Node_0x4E: coded
- Node_0x8A: coded
→ 应用
模块 17 → 编码:
Lane_change_assistant: yes
Lane_change_assistant_BAP: yes
→ 应用(重启模块)
模块 13 → 编码:
Control_module_for_lane_assistance: installed
Lane_change_support: 激活
→ 应用(重启模块)
模块 03 → 编码:
字节 29 – 位 7:激活(1XXXXXXX)
→ 应用(重启模块)
模块 5F → 编码:
Car_Function_List_BAP_Gen2:
- SWA_0x1A: 激活
- SWA_0x1A_msg_bus → 扩展数据总线(CAN_Extended)
Car_Function_Adaptations_Gen2:
- menu_display_lane_assistant: 激活
- menu_display_lane_assistant_over_threshold_high: 激活
全景影像系统编码(如有)
模块 6C → 编码:
equipment_RTA: installed
→ 应用(重启模块)
模块 76 → 编码:
Rear_Cross_Traffic: Alert: mit RCTA
→ 应用(重启模块)
模块 A5 → 编码:
SWA: Coded
→ 应用(重启模块)
模块 3C → 编码:
Pre_Sense: without_Pre_Sense
Rear_Cross_Traffic_Alert: with_RCTA
ECU for draw bar: no ECU for draw bar
steering: left-hand drive
Rear_Axle_Steering: without_Rear_Axle_Steering
Lane_Departure_Warning_System: with_Lane_Departure_Warning_System
Front_Sensors_Driver_Assistance_System: with_Front_Sensors_Driver_Assistance_System
Diagnosis_RCTA: tone_via_PLA
→ 应用(重启模块)
自动大灯
为此需要新的开关 5G0941431BD 以及光雨传感器 5Q0955547C
开关安装
模块 09 → 匹配:
Aussenlicht_uebergreifend:
- LDS_mit_AFL: Yes
→ 应用
光雨传感器安装
模块 09 → 匹配:
Lighting_Assist_Adaptation:
- Regen_Lichtsensor: LIN_Regen_Licht_Sensor
- Feuchtesensor: Installed(如果有湿度传感器)
完成这些编码后,光雨传感器会出现在 09 模块的编码中。 为其写入编码:
模块 09 → 编码 → 子模块 RLHS:
- 3CA8DD — 大灯开启不那么晚,大约在 1200lx 时
- 3CA8D7 — 大灯开启很晚,在 800lx 时
[PR-7K3] Direct RDKS/TPMS – 直接式胎压监测系统
RDKS (Reifen Druck Kontrolle System) 或 TPMS (Tires Pressure Monitoring System)
参数数据集:
| 设备 ID | 参数数据集 (ODIS XML) |
|---|---|
| 5Q0907273B | (下载) |
所需操作
- 将 RDKS 系统天线(5Q0907273B)安装在后右翼子板处(保险杠下方的原厂安装位)
- 敷设线束,连接到电源和 CAN 总线
- 安装胎压传感器(5Q0907275B)
- 将参数数据集写入天线,对车辆系统进行编码
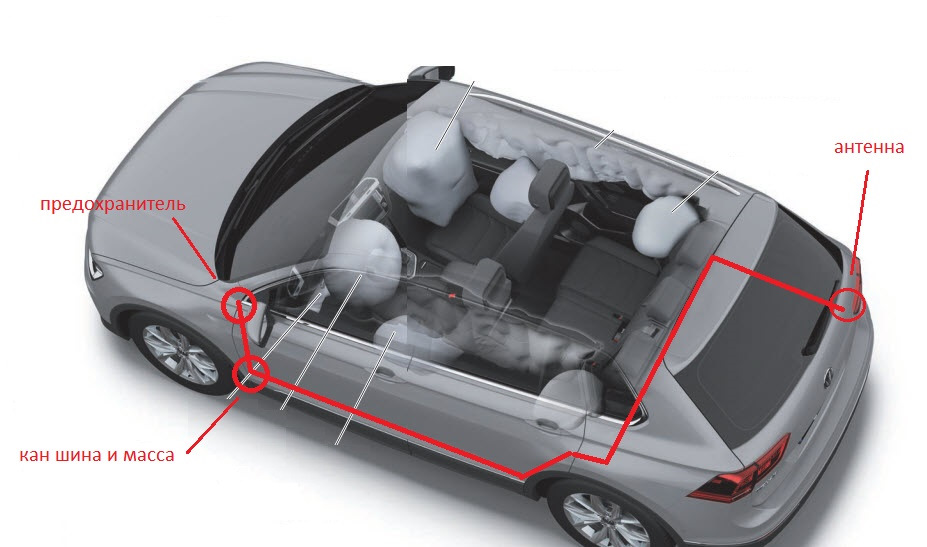
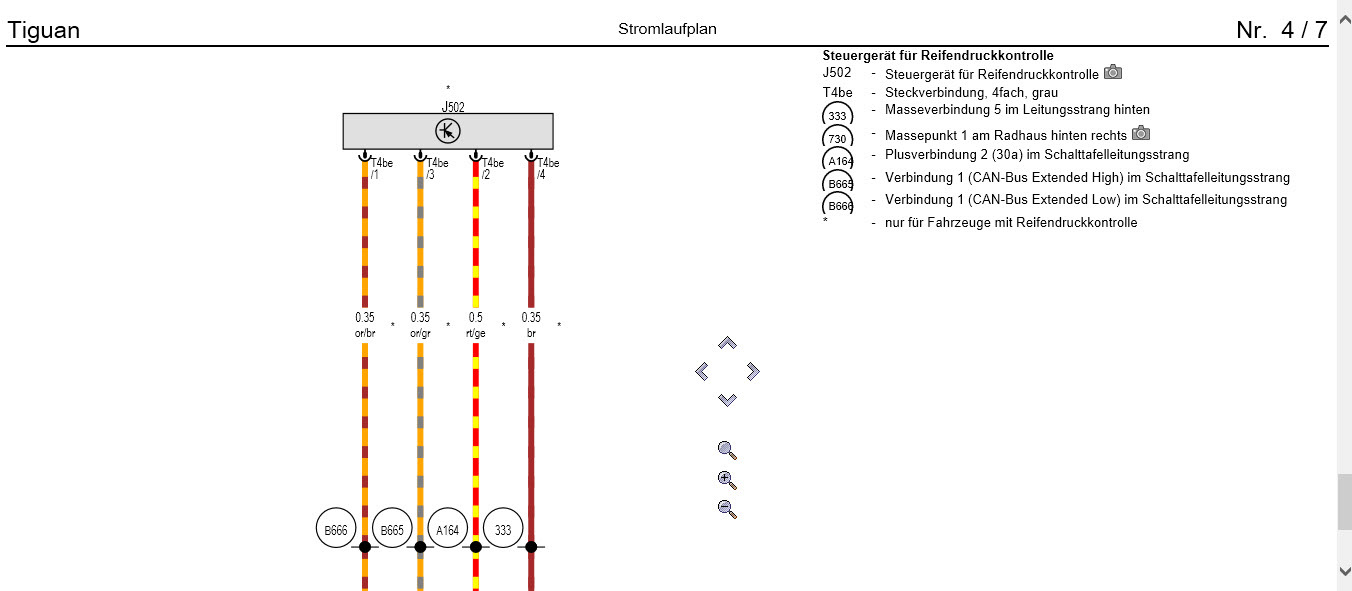
ELSA 中的接线图(使用 4 根线 — 12V 电源、搭铁以及 CAN 总线的 CAN Ext High 和 Low 导线)
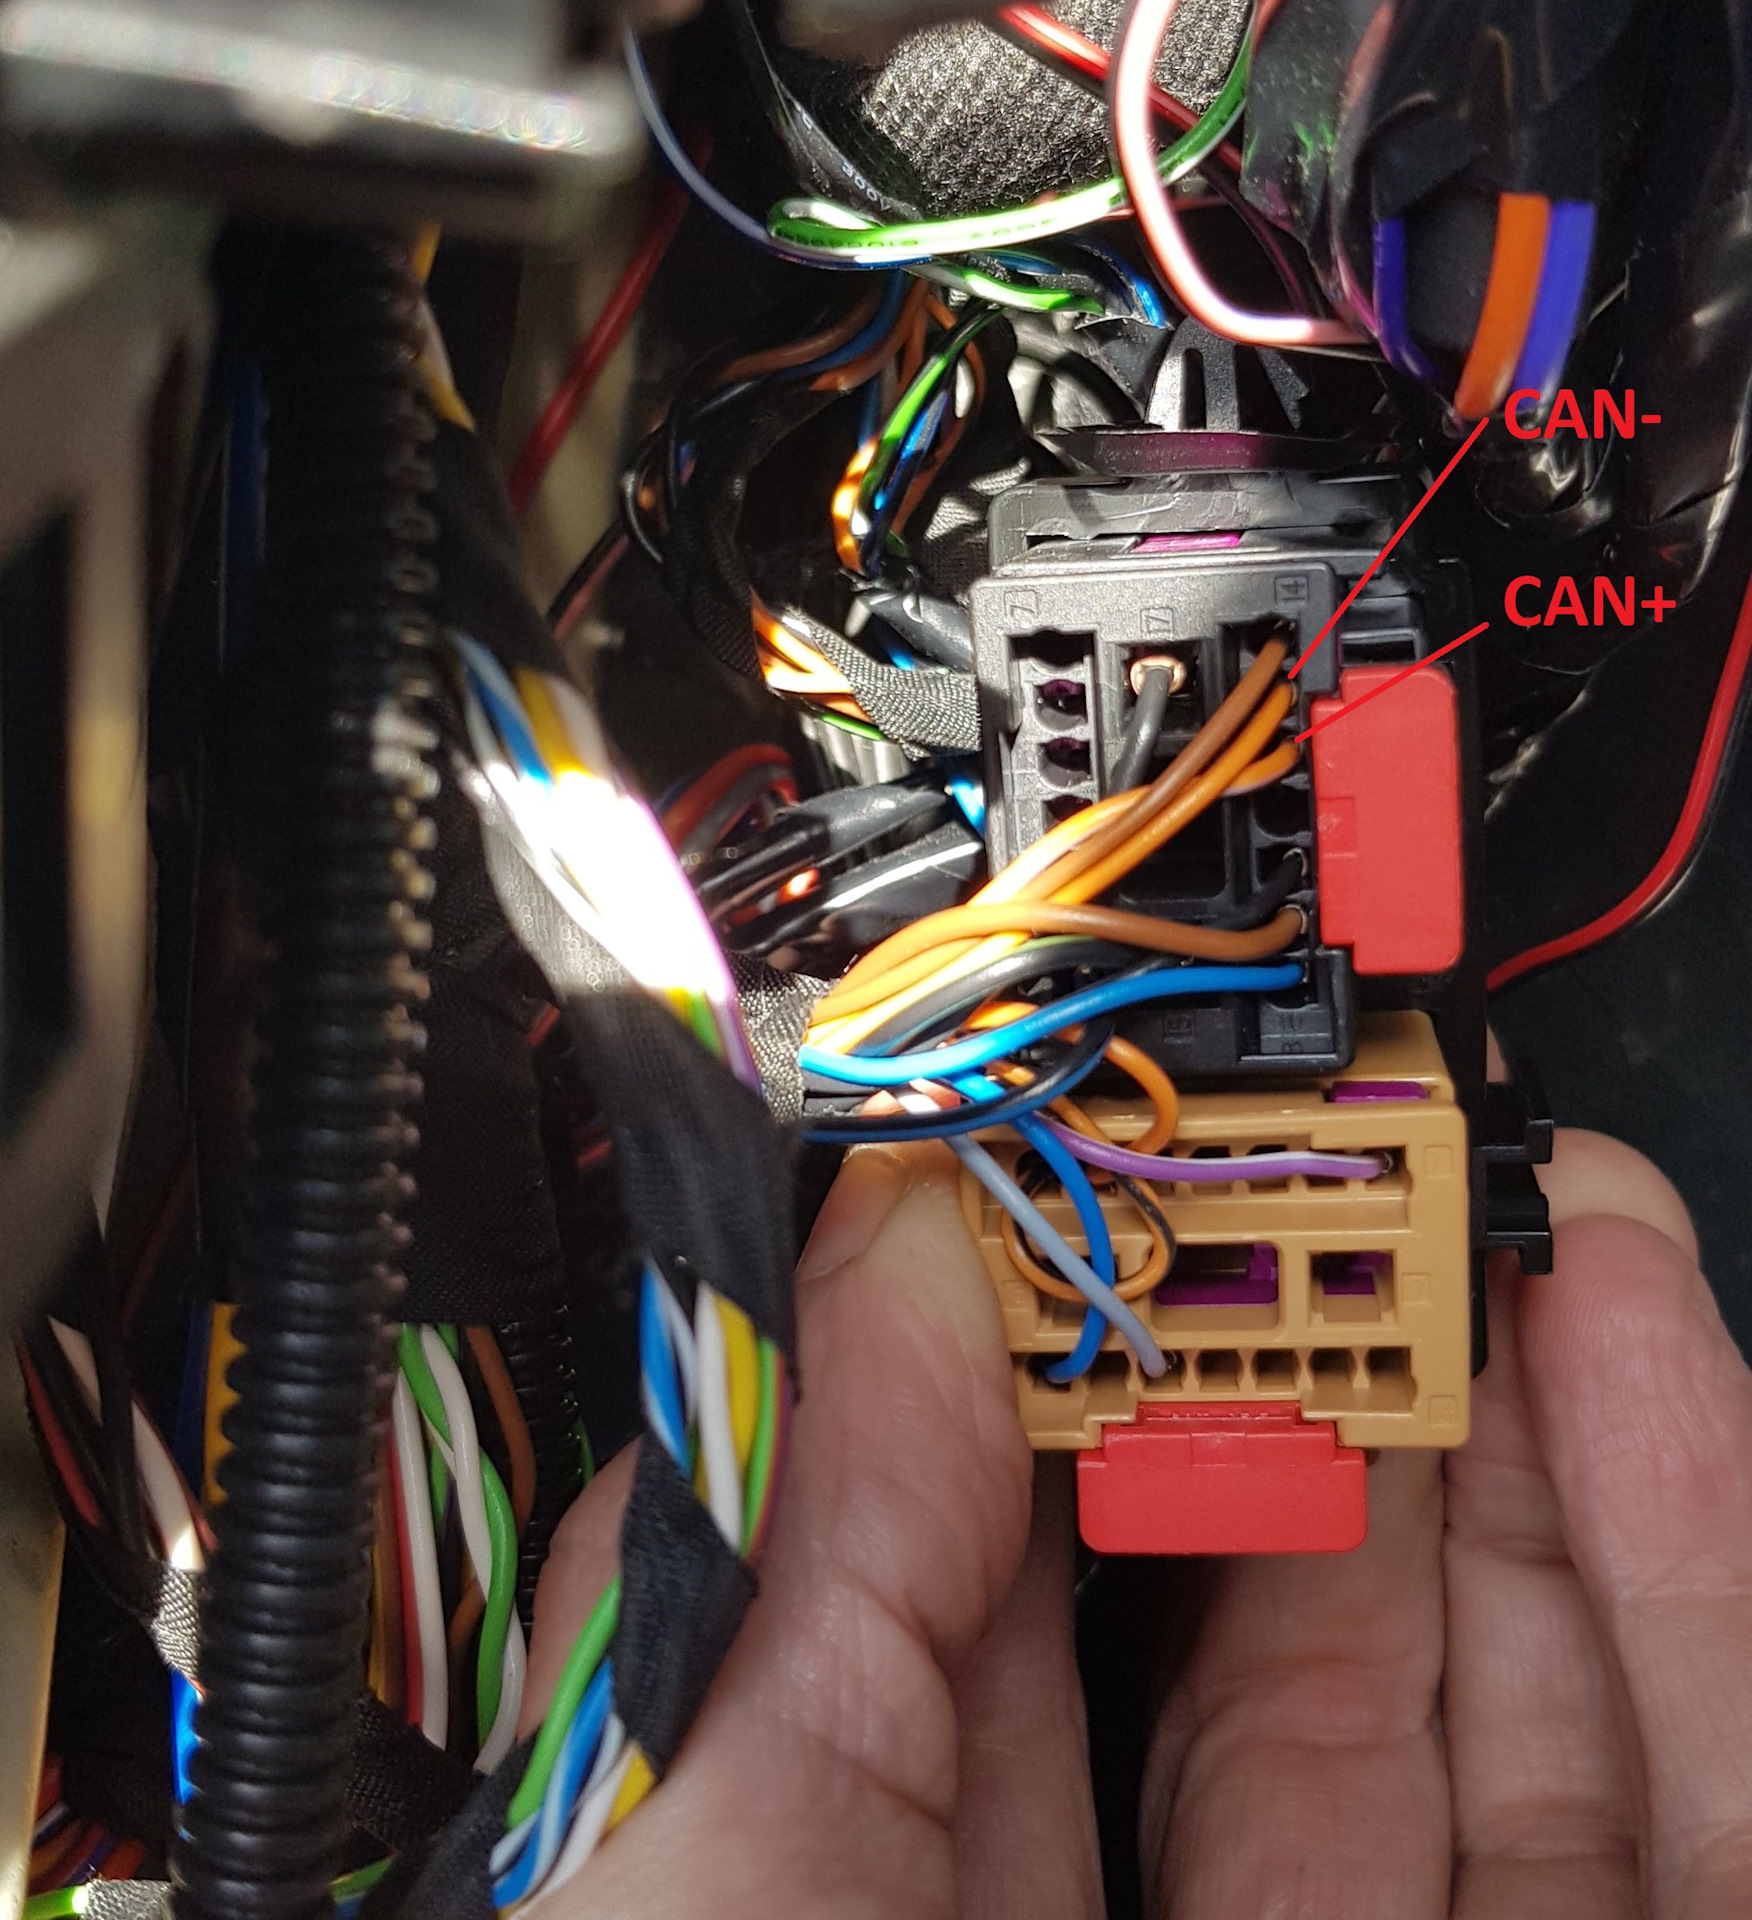
CAN 总线位于引擎盖开启拉手附近、饰板后面。T17a 插头,针脚 12(CAN High)和 13(CAN Low)
 电源来自保险丝盒。如果"原厂"7 号保险丝已被占用,可以使用空闲的 45 号或 38 号。
编码
模块 19 → 设备列表:
65(胎压监测系统控制单元):已安装
→ 应用
关闭间接式胎压(如果此前已激活)
模块 03 → 编码:
字节 27 – 位 4,5,6:关闭
字节 28 – 位 7:关闭
→ 应用(重启模块)
模块 17 → 编码:
字节 4 – 位 0(Indirect Tire Pressure Monitoring System(TPMS) installed / 胎压监测指示灯):关闭
→ 应用(重启模块)
激活 RDKS
模块 17 → 编码:
字节 3 – 位 7(Direct Tire Pressure Monitoring System(TPMS) installed / 胎压监测指示灯):激活
字节 11 – 位 2(Direct Tire Pressure Monitoring System(TPMS) BAP installed):激活
→ 应用(重启模块)
在主机菜单中激活
模块 5F → 匹配:
Car_Function_Adaptations_Gen2:
- menu_display_rdk: 激活
- menu_display_rdk_over_threshold_high: 激活
→ 应用
---
Car_Function_List_BAP_Gen2:
- tire_pressure_system_0x07: 激活
- tire_pressure_system_0x07_msg_bus: CAN_Extended
→ 应用
编码后需行驶约 1 公里以激活系统